Sending Bulk Emails from Sports Connect
Sending a Bulk Email
Use the Bulk Email tool to contact users on your site! The Bulk Emailer also contains premade groups that'll allow admins to reach out to users by Program, Division, Team, etc.
Steps to Send an Email:
1. Go to Email
2. Select the email Group you'd like to add Recipients from. Choices include:
- Programs
- Divisions
- Teams
- Volunteer Roles
- Open Orders
- Overdue Installments
- Wait List
- All Active Users
- All Inactive Participants*
- Users
- Roles
- Shopping Cart Orders
- Archived Programs
- Archived Divisions
- Custom Groups
- Verified/Unverified Players or Volunteers
Once the Group is selected, options to filter the group further will appear.
*Note: the definition of Inactive includes ALL prior registrations which do not have a current registration or open shopping cart regardless of the program being Archived or Unarchived.
3. Add Recipients to your recipient list by clicking the plus sign (+) to the left.
4. To manually add additional email addresses (email addresses not already in the system), type or paste the emails into the Additional Recipients field. If you are adding more than one email address, they must be separated by a semicolon (;). See Email External Members for help on how to do this in an excel file.
5. Change the From Name if you'd like. The system will automatically pull your Display Name but you can replace that with your organization's name if you'd like.
6. If you want users to reply to a different email address than the one connected to your account, enter that email address in the Reply To section.
7. Give your email a Subject.
(Optional) Select a Template. Then replace the Latin text and stock images with your own text and images. *Please Note: you must select the template before typing the email. See our Create Email Templates help page.
Or just type up your own email in the Message section. You can add Images, links to URLs, links to Documents, and much more!
Mail Merge Tags - Personalization
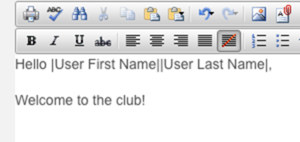
8. One way to make your email more personal is to add a Merge Tags. This auto-populates certain information when the email is sent out, like the name of the user it is sent to. You will see a drop-down option in the edit toolbar.
9. Your email will look like this when selected.
10. You can also add attachments by clicking on Attach a File. These pull from files that have been uploaded to your File Manager. *Special Note For Sending Attachments: Since many mail providers and anti-virus programs have very strict attachment policies, we strongly recommend that instead of attaching the file, you provide a link to the file in the body of the email. This will ensure that your email does not get blocked or slowed down by the major mail providers and anti-virus programs out there.
11. Double-check your work, then click on Send Now. *You'll receive a copy of the email and a Newsletter Confirmation email.
12. If you would like to schedule your email for later, click on Schedule Email. For more information on this, click here.
13. A message of "Your email is being sent in the background" will display with a link to our Email Statistics feature. The composer of the email (and the site's Lead Administrator) will receive two emails - the first indicates the email has been initiated and queued, and another confirming the actual sending of the email.


